Making a Field NPC
In this guide I will be assuming that you have set up your Unity environment for characters, that you have ripped a character model and modified it in modelling software, that you have exported it as an FBX and that you have read the sections concerning the Character Shaders, the Animator component, Field Character Entity Monobehaviour and (optionally) the Color Variation Monobehaviour in Monobehaviours. I am going to be demonstrating adding the Platinum Style Barry, as seen in Luminescent Platinum.
I would always recommend adding a ripped prefab of a similar sized character to your scene first. Then moving them to the side to be used as size reference. You can then import your FBX and add it to the scene too. If the size seems off then you can check the scale and also try toggling the Convert Units in the FBX import settings.
With your model added to the scene and at the correct scale, check that it animates by selecting an animation (either one that you ripped with the Unity project or one that you have created for yourself if you happened to do so when making your model) and then dragging your custom prefab onto the preview window.
With this you can be sure that your model is rigged and animating properly and you are ready to move on to implementation.
-
Make sure that your custom prefab is named appropriately. If you are overwriting an existing character then name the prefab the same as theirs. If you are wanting to insert a new character without overwriting one, name it something unique. It is recommended to use the prefix "fc" for "field character".
-
Ensure that all of the materials on your model are using a character shader. I find that it is best to duplicate similar materials from those that were ripped with the Unity project and then to apply custom textures and tweak the material settings from there.
-
Add the Animator, Field Character Entity and (optionally) the Color Variation components to your prefab. Fill out the information for each as described in the Character Monobehaviours and Components section. To save time, you can copy the components from one of your ripped prefabs and paste them onto your custom one; modifying data as appropriate.
-
Select each of your Mesh objects and in the Skinned Mesh Renderer component, ensure that Receive Shadows is disabled.

-
From the Hierarchy tab, drag your custom prefab into a folder in the Project tab and select "Original Prefab" when prompted.
-
Select Window, AssetBundle Browser from the top bar. Drag and drop your new Original Prefab from the Project tab into the "persons/field" folder. Select Build at the top and then press the Build button below.
Your custom Assetbundle is now built. We need to process it with LumiTool to make the game accept it.
- Open LumiTool and select the Bundle Prepper.
- Open your custom AssetBundle in the Loaded Rebuilt Bundle section. It will be located in "AssetBundles\StandaloneWindows\persons\field" of your Unity project.
- Without changing any of the settings, select Execute Script. It will prompt you to choose which shader is used by which materials. Match them to those that you used in the Unity editor.
- When prompted to do so, save your bundle to a new location.
- (Optional) LumiTool does not yet have the ability to compress your AssetBundles. You can do so yourself with a third party application such as UABEA or my own AssetBundle Mass Compressor. If using the former, make sure you choose LZ4 compression.
You now have a custom AssetBundle that the game will accept. I'll now walk you through the instructions for how to make a mod that uses it.
Switch and Switch emulators use a system called LayeredFS for mod loading. This means that if files are found in your mod folder that match files found in the romfs for the game, then the modded files will be loaded instead. Therefore our mod needs to match the folder hierarchy of the game.
Making a mod that replaces an existing NPC:
- Create a folder tree of the following folders:
"ModName\romfs\Data\StreamingAssets\AssetAssistant\Characters\persons\field".
- Making sure that the file is named the same as the NPC that you are replacing, put the file in the field folder.
Making a mod that adds a new NPC:
- Create a folder tree of the following folders:
"ModName\romfs\Data\StreamingAssets\AssetAssistant\Characters\persons\field",
"ModName\romfs\Data\StreamingAssets\AssetAssistant\Dpr".
-
Copy the masterdatas file from Dpr folder of your vanilla game romfs to the same folder in your new mod and copy Dpr.bin from the AssetAssistant folder of your vanilla game romfs to the same folder in your new mod.
-
Put your custom AssetBundle in the field folder.
-
With LumiTool, select the AssetAssistant Manifest Editor, open Dpr.bin, select Add Record and input data as below but named for your AssetBundle.
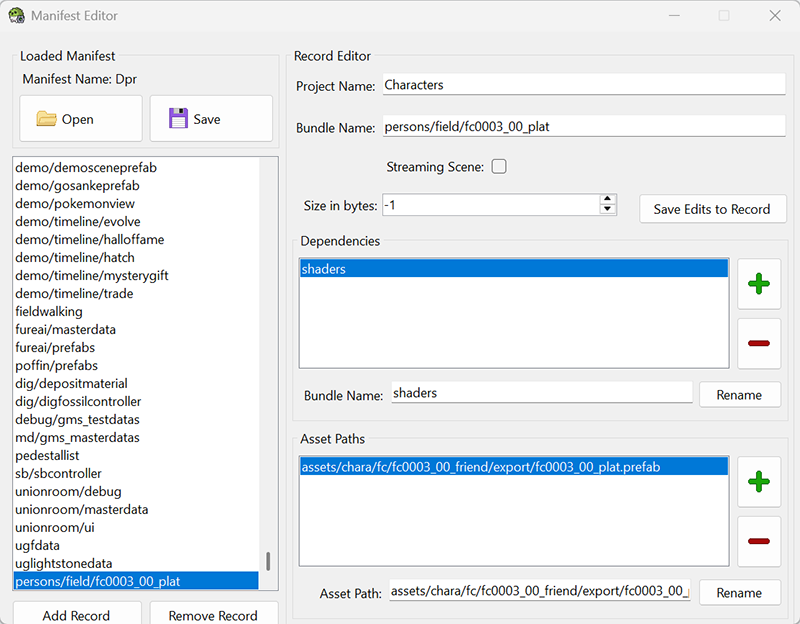
-
Using UABEA, open masterdatas and expand the array to add an entry to the bottom of CharacterGraphics_data for your new character. Make sure that the FieldGraphic name matches the file name of your AssetBundle and you can use 9223350612601226578 for your animTbl PathID. Take note of the ObjectGraphicIndex or OGI (142 in the example below) of the array entry.
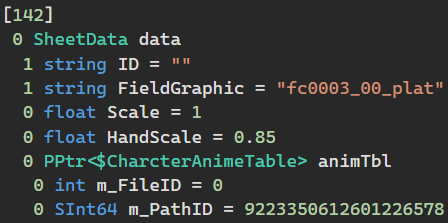
-
Still in masterdatas in UABEA. You can use the OGI of your new character in any of the PlaceData files to add it to the overworld.
With all of your files saved, you can load your mod and your character should be in the game!