Making a Battle Player
In this guide I will be assuming that you have set up your Unity environment for characters, that you have ripped a character model and modified it in modelling software, that you have exported it as an FBX and that you have read the sections concerning the Character Shaders, the Animator component, Battle Player Entity Monobehaviour, and (optionally) the Color Variation and UV Connection Monobehaviour in Monobehaviours. I am going to be demonstrating adding the Cyber Style 2.0 Dawn, as seen in Re:Illuminated Platinum.
Note that some exefs modification with C++ is needed to add entirely new outfits without replacing any.
I would always recommend adding a ripped prefab of a similar sized player character to your scene first. Then moving them to the side to be used as size reference. You can then import your FBX and add it to the scene too. If the size seems off then you can check the scale and also try toggling the Convert Units in the FBX import settings.
With your model added to the scene and at the correct scale, check that it animates by selecting an animation (either one that you ripped with the Unity project or one that you have created for yourself if you happened to do so when making your model) and then dragging your custom prefab onto the preview window.
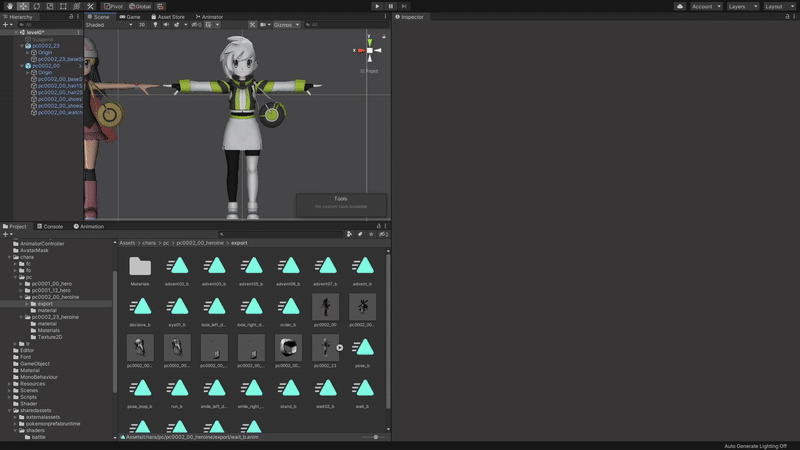
With this you can be sure that your model is rigged and animating properly and you are ready to move on to implementation.
-
Make sure that your custom prefab is named appropriately. If you are overwriting an existing character then name the prefab the same as theirs. If you are wanting to insert a new character without overwriting one, name it something unique. It is recommended to use the prefix "pc0001" for male battle player characters and "pc0002" for female battle player characters.
-
Ensure that all of the materials on your model are using a character shader. I find that it is best to duplicate similar materials from those that were ripped with the Unity project and then to apply custom textures and tweak the material settings from there.
-
Add the Animator, Battle Player Entity and (optionally) the Color Variation and UV connection components to your prefab. Fill out the information for each as described in the Character Monobehaviours and Components section. To save time, you can copy the components from one of your ripped prefabs and paste them onto your custom one; modifying data as appropriate.
-
Select each of your Mesh objects and in the Skinned Mesh Renderer component, ensure that Receive Shadows is disabled.

-
Select your custom prefab and set the Layer to Character. Choose "Yes, change children" when prompted as well.

-
From the Hierarchy tab, drag your custom prefab into a folder in the Project tab and select "Original Prefab" when prompted.
-
Select Window, AssetBundle Browser from the top bar. Drag and drop your new Original Prefab from the Project tab into the "persons/battle" folder. Select Build at the top and then press the Build button below.
Your custom Assetbundle is now built. We need to process it with LumiTool to make the game accept it.
- Open LumiTool and select the Bundle Prepper.
- Open your custom AssetBundle in the Loaded Rebuilt Bundle section. It will be located in "AssetBundles\StandaloneWindows\persons\battle" of your Unity project.
- Without changing any of the settings, select Execute Script. It will prompt you to choose which shader is used by which materials. Match them to those that you used in the Unity editor.
- When prompted to do so, save your bundle to a new location.
- (Optional) LumiTool does not yet have the ability to compress your AssetBundles. You can do so yourself with a third party application such as UABEA or my own AssetBundle Mass Compressor. If using the former, make sure you choose LZ4 compression.
You now have a custom AssetBundle that the game will accept. I'll now walk you through the instructions for how to make a mod that uses it.
Switch and Switch emulators use a system called LayeredFS for mod loading. This means that if files are found in your mod folder that match files found in the romfs for the game, then the modded files will be loaded instead. Therefore our mod needs to match the folder hierarchy of the game.
Making a mod that replaces an existing Player:
- Create a folder tree of the following folders:
"ModName\romfs\Data\StreamingAssets\AssetAssistant\Characters\persons\battle".
- Making sure that the file is named the same as the NPC that you are replacing, put the file in the battle folder.
Making a mod that adds a new Player: Requires exefs modification
- Create a folder tree of the following folders:
"ModName\romfs\Data\StreamingAssets\AssetAssistant\Characters\persons\battle",
"ModName\romfs\Data\StreamingAssets\AssetAssistant\Dpr".
-
Copy the masterdatas file from Dpr folder of your vanilla game romfs to the same folder in your new mod and copy Dpr.bin from the AssetAssistant folder of your vanilla game romfs to the same folder in your new mod.
-
Put your custom AssetBundle in the battle folder.
-
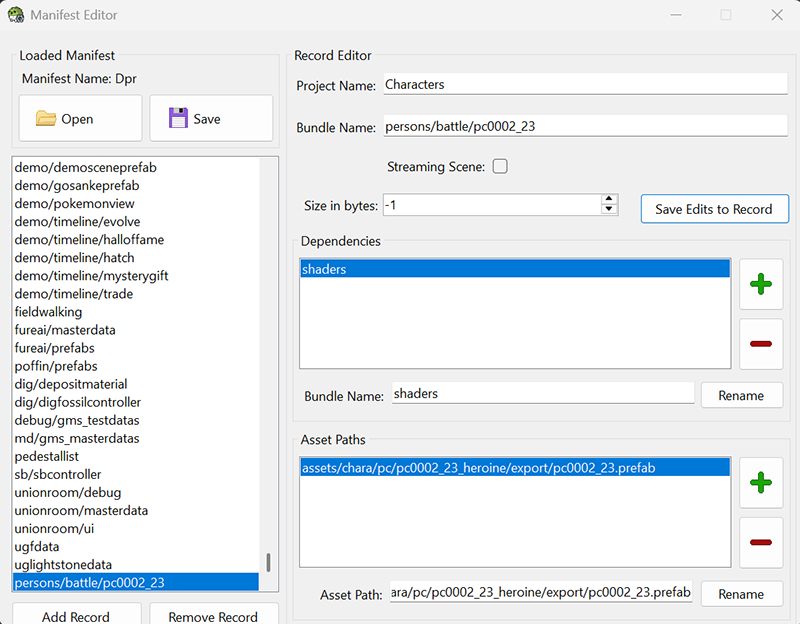
With LumiTool, select the AssetAssistant Manifest Editor, open Dpr.bin, select Add Record and input data as below but named for your AssetBundle and the Dependencies that your bundle uses.
-
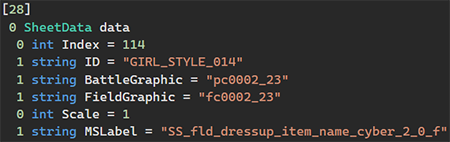
Using UABEA, open masterdatas and expand the array to add an entry to the bottom of CharacterDressData for your new player. Iterate the Index and ID from the last BOY_STYLE or GIRL_STYLE in the file (Index 0-99 is for BOY_STYLE, 100-199 is for GIRL_STYLE). Make sure that the BattleGraphic name matches the file name of your AssetBundle. Making the AssetBundle for the FieldGraphic is explained in Making a Field Player but you can copy from another for the moment. Make up a unique name for the MSLabel and take note of it.
-
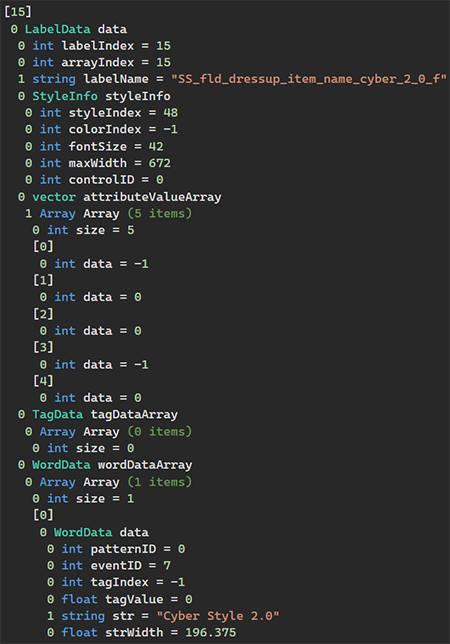
Save masterdatas and open english in UABEA and expand the array to add an entry to the bottom of english_ss_fld_dressup_item_n. Iterate the Indexes and make sure the labelName matches the MSLabel that you created. You can define the name of the outfit at the bottom in str. You can also calculate the strWidth with this calc_strings python script.
-
Save and close the file.
-
This final step requires modifying exefs. Instructions for which are here https://luminescent.team/rom-hacking/category/exefs, however you will need some amount of knowledge in C++. The Re:Illuminated rombase will have a solution to add outfits without needing to modify exefs, when it releases. You must modify the Dpr_UI_ShopBoutiqueChange_SetupBoutiqueItemParams hook to increase the outfit limit. There are a myriad of ways to do this but keep in mind that the vanilla implementation expects an equal amount of outfits for Lucas and Dawn. So simply expanding the dressID number may not be suitable if you are not adding outfits for both. Also keep in mind that the final index outfit in the vanilla game is the bike outfit. So you will need to add a check to skip that one.
-
Compile your modified exefs and add them to
"ModName\exefs".
With all of your files saved, you can load your mod and your player character should be in the game!